Materials: A Place For Everything and Everything in Its Place
In the previous two pages, we considered classroom procedures in general, in Classrooms: Control, Work Cycles & More, and how to get the writing process started, in Preparing For the Active Work Period. Now we look at the classroom itself.
In an active classroom, where children pace themselves and are encouraged to choose their own activity once their work is finished, they need a variety of valuable materials to choose from. These materials need to be out on shelving, within easy reach of the children and in exactly the same place from day to day — with most of them carefully demonstrated before they’re added. Following are some examples from my classrooms, with a link to more ideas at the bottom of the page.
Interest Areas
We had several open-ended areas always available for use when the children finished their work:
- Class Library — a loft made by a parent;
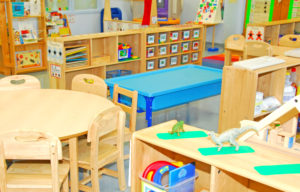 Sand Table at waist height for the children, similar to that pictured in the photo of the blue table, covered by the blue lid. It included trucks and toy figures, and children were encouraged to bring what they would like from home. The lid was easy to take off, and it was replaced during the writing period, as play there could become too noisy.
- Restaurant, with table and chairs, play food and money, cash register and pad for writing checks.
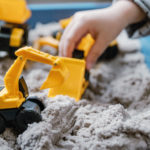
- Listening Post, with recorder and record player.
- Creative Center, with fabric cut into shapes, ribbon, lace, trim, yarn, etc., scissors, glue and construction paper.
- Easel and other kinds of painting materials, with tables easy to clean (used only when a Helper was also in the roo
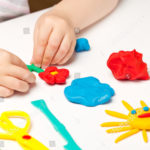 m to help with any cleanup needed).
 - Play dough or clay.
- With always more being substituted or added ….
Math and Memory Game: Concentration
Concentration is a very popular combination memory and math game: Two children sit on the large rug, with a small rug sample between them. They have a set of regular playing cards that have been reduced to only cards that add up to a predetermined number. For example, if the set is to add up to 6, they will have pairs of 2’s and 4’s, 3’s and 3’s, 5’s and 1’s (aces). (I bought several sets of cards of the same design and pared them down to make sets with combinations ranging from totals of 5, 6, 7, 8, 9, and 10. We had 3 sets of cards for each of those numbers. Each set was topped by a hand-written card showing the number for that set.
The concept level a child should select is written on a slip of paper and kept in the same bag used to keep the dice for Bead Trading. (See *** under Ideas for a Math Program, below.) So they look there first, to know which set of cards to choose. They can play this game with anyone else who can play at or above their level. Play goes as follows:
The two children lay the cards out in rows of no more than four cards each, face side down between them. Then the first child turns over 2 cards, keeping them where they were, hoping the two cards will add up to the number of the set they are playing with. (So in the set marked “8,” they are looking for 1&7; 2&6; 3&5; or 4&4). If they have chosen a correct pair, they put the cards in a stack in front of where they are sitting and the other child takes a turn. If not, they turn them face down again, exactly where they were, before the other child takes their turn. Both children are hoping they will remember where the cards are so they can find them again when they need one of them. I made two sets of each total number, with combinations adding up to 6, 7, 8, 9 and 10. (So we had 10 sets.) A paper with the number the set was to add up to was placed on top of the cards, and the set was tied with rubber bands and kept in numerical order out on a shelf. (I could also have made subtraction games, but I never got around to it.)
Examples of Self Teaching and Practicing Trays
This basic idea of self-teaching materials comes from Montessori. They are simple, and the variations are endless. Trays can be “self-correcting,” or they are simply for exploration and the honing of skills. 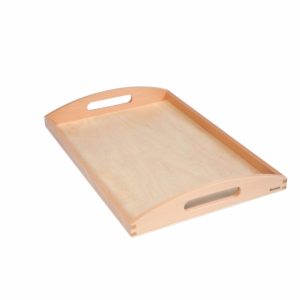 We used wood trays, always with a lip on them, as the children would be carrying them from a shelf to their table. (Check Nienhuis online for such trays. Montessori commissioned all her materials to be made by Nienhuis, and the directress in my Montessori school, trained in Holland, would have nothing else.) The materials are always as pleasant or intriguing as possible. When possible, the materials should also be breakable, so the child needs to take great care — as the teacher does when modeling during the Silent Demonstration. But for safety, I always used ceramic, not glass containers and told the children to ask for help to clean up, if something broke. Each time a new tray was added, if the procedure was different from others the children knew how to work with, the tray would be introduced by a Silent Demonstration. If the objects were all that was different, the children need only be shown the new objects, not watch an entire demonstration again.
Self-Correcting Tray: The possibilities for this are endless — to practice recognizing numerals, how to read the words for different colors, shapes, objects, etc. One example, for numerals, would be to practice recognizing the numerals 1 through 10: It would have 10 containers (small cups or cylinders), each with a different number on the front, from 1 – 10. For self-checking, the same numbers would be placed on the back of that container, including the corresponding number of dots. Included on the tray might be enough flags (or other objects that would intrigue the child) to sort from 1 to 10. The child would first place the containers in order from 1 – 10 — checking on the back to see they were correctly placed. Then they would turn the containers around again so that only the numerals faced them — then add the correct number of flags to each container. Finally, the child would turn the containers around check the number of dots against the number of flags. When finally finished to their satisfaction, they would ask the teacher or a helper to “see and check” their work.
Another example for recognizing numerals would have one set of 10 cards — each with a different numeral on it, from 1 – 10. A second sent of cards would have with dots on the front and corresponding numeral on the back. The task is to lay the first cards out in order. Then place the appropriate number of dots beside each of the first set of cards. The self-check would be to turn each of the second set of cards over, to see if the numerals match.
For recognizing the names of colors: The first set has large dots of color on the front — each with a different color. The second set has the name of a color on the front and the corresponding dot of color on the back. The task is to match the dots with their names — and the check is to turn the second set over and see if the colored dots match.
Tray For Distinguishing Differences: Example of a trays to distinguish colors, shapes or objects, etc. The objects could be buttons of different colors or shapes, tiny animals or various other small objects that could be sorted into different containers.
Tray for sorting Objects According to Beginning or Ending Sounds: One picture from the phonics program is placed on the outside of a small plastic “Zip Lock.” A variety of small objects are inside the bag, some that start with the sound, some that do not. The children — alone or in pairs, taking turns — sort them into “yes” and “no” piles. When finished, they ask someone older to check s their work.
Honing of Skills: An example focused on distinguishing slight differences in colors would be to get several sets of 2 identical paint samples, each with several shades of the same color on them. Write a number or letter on the back of each shade, and write the same/letter number on the duplicate. Cut up ONE set and leave the other uncut. Mix the strips into a container, leave the uncut strips stacked on the tray. The child first lays the uncut strips out on the mat, then matches the ones in the container to the ones laid out. When finished, they check their work by looking to see if the numbers/letters on the back of them match.
Gather a duplicate set of several sizes of nuts and bolts. The child is to lay out the bolts first — from small to large. Then, leaving the nuts mixed up on a small piece of felt, they try — first just by looking — to lay each nut beside the bolt they think it will fit. The check is whether they will be able to screw the nut onto the bolt they thought it matched. When finished, they might ask someone to admire their work.
Pouring Water (or rice): Place two ceramic pitchers on a tray. One is filled with water (if not, and the cannot reach the fountain, the child asks an aide or tutor to fill it and return the tray to the shelf, so that the child has to carry the tray to the table). The challenge is two-fold: to carry the tray to the table with out spilling — and then to pour the water back and forth without spilling it. (This one needs to be carefully demonstrated and the children shown how to clean up any spills. This was in my Montessori preschool, so it’s definitely not beyond older children in primary grades, teaching them to walk and otherwise move carefully.)
Recall that materials of this sort are always placed on a small rug on the large floor rug, or on a felt mat if at the table. This is to define the work area, as the children are always to be careful not to disturb someone’s work.
Ongoing Math Table Game: Bead Trading
By far the most valuable and popular game was “Bead Trading.” I would never have a classroom without this game, as it’s extremely effective for developing math concepts and can be played at the same time by children at various skill levels. Through Bead Trading, they eventually absorb and learn to write the problems for addition, subtraction, and multiplication — all the while loving to play it. I made up the game with materials from Montessori Golden Beads.* Here are screenshots of Montessori beads 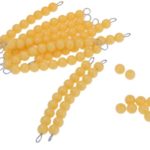
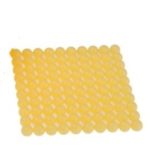
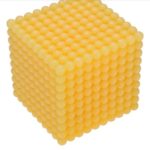 available from Nienhuis online: A Cube of 1,000 beads, Squares of 100 beads, Bars of 10 beads, and Single beads:
Sources for Beads: In our Montessori school, we ordered the bead materials from Nienhuis. But for my K-2 classroom, I strung a set myself, using beads and wire I got at a local crafts store. These beads are now available online from various places, including www.nienhuis.com.
Number of Beads Needed: Only 1 One Thousand Cube is needed per classroom, as it is expensive, and needed just to show the concept. (If the children are keeping a running score of games from day to day, the first time someone reaches 1,000, all running scores drop again to zero.) The number of 100’s Squares, 10’s Bars and Ones needed is equal to 9 times the number of children you want to be playing at a time. Play moves along best with 4 players, so a table would need 4 x 9 = 36 of each type. We usually had two tables going, so I had made 8 x 9 = 72 of the 100’s, 10’s, and Ones. (Each table needs a Banker, who does not also play.)
Bead Trading Play: Children at any skill level can play together in a group of no more than 4 players, plus a Banker. Each child in the class has a small plastic bag with the dice appropriate for their level. (See below for how a child’s Math Level was determined, using Unifix Cubes.)*
 Each table group has —
One Game Board sitting in front of each player, with Sections of the board marked with the appropriate numerals and/0r names spelled out as shown. (Our boards were made from card stock and laminated.)
A Banker: One “older” person who pays out the beads after each roll. (Some “older” children in the class can do it, a cross-age tutor is best, but an adult will also do.)
A spinner indicating both “High” and “Low” (If the children are keeping a running total from one day to the next, you do not need this. But if not, a spinner is used at the END of the game to determine the winner. With this, there’s no temptation to cheat to get the highest total. There is no prize for the winner — just the pleasure of winning.)
When a child rolls their dice, the banker gives them the beads they have “won.” But they can only have 9 ones, 9 tens bars and 9 one hundred squares on their board. So, for instance, if a child already has 8 Single One’s and they roll a 5, they will have to trade in their 8 Single One’s and 2 of the beads they won to buy a Ten Bar, leaving them with 1 Ten Bar and 3 single beads on their board, sitting in the appropriate places. And experienced player will have learned that, so the Banker always waits for the child to say what they should get. (A banker who regularly fails to wait, will be barred from being Banker.) So for example:
Say the child in the example above — who has rolled a 5 and already has 8 SINGLE beads sitting in the ONES place on their board — is young and new to the game. When they role the 5, the Banker will put the 5 new singles in the ONES PLACE on that child’s board (or hand them over and tell the child where they go). Then the Banker will WAIT, to see what the child does. If that new child has forgotten the rules, the Banker (and probably the other children) will tell the child they can only have 9 beads in the ONES place, and show the child they have enough in that place to trade 10 single beads for one TENS BAR. This leaves the child with a TENS BAR in the TENS PLACE and THREE SINGLES in the ONES PLACE. Eventually, that same child in this example, having played the game many times, will not wait for a Banker to show them what they will get. Instead, before the Banker has given them anything, they will hand the Banker 5 of their single beads and say, “I’ll buy a TEN BAR!” It’s amazing to watch number concepts in the base ten become so automatic in young children, just from playing this game.
Ideas for a Math Program: Using Bead Trading to Structure An Individualized Approach
While this website focuses on literacy skills, I’ve also included a description of our math program:
While Bead Trading was always available as a choice activity, I also noticed how quickly the children caught on to number concepts while playing, so I developed a sequential structure to move them forward. We worked on this during a period devoted to math, which usually followed the writing work period. During that time, we had two Bead Trading Tables going — one for practice, run by an older student or parent. I often served as Banker at the other table, so I could check how children were doing and whether they were ready to move on to the next level. (The rest of the class was assigned to either be working on paper/pencil math work, or chosing from the materials in the environment.)
MATH LEVELS AND MATERIALS: Our math program was structured by a series of math levels, with different die and other materials for each level. Each child then had a plastic zip-lock bag with their own set of materials, according to the following Levels:
Level I: 1 die with dots.
Level II: 1 numbered die with a number strip to keep at the table while playing. The number strip had the numerals and corresponding number of dots: | 1 *| 2 ** | 3 *** |4 **** | etc., so that the child could count the dots to verify numeral.
Level III: 2 dice — 1 numbered and 1 with dots. Also a number strip.
Level IV: The following changes slowly, in this sequence —
-
- change dice to 2 numbered, below 6
- change one dice to numbers 6 and above
- add score cards (these were small score cards, made of regular paper, with spaces for writing out scores: 2+5 = 7, etc.)
- add dice showing + or – (Until now, the children understood they were to add.)
- change from beads to play money
- replace the lower-numbered die with one of higher numbers
Level V: After introducing multiplication to a child at my Bead Trading Table —
-
- use 2 dice below five, along with a die marked with +, -, and X — so when the die lands on X, the child multiplies
I bought ordinary dice and made the other dice from blank wood cubes I found at a craft store. We kept the children’s bags in a box near the beads, alphabetized. I had a math time, during which I was the banker in Bead Trading at one of the 2 tables, to watch for when a child was ready to go to the next Level. (I had one rather extreme case of a kindergarten boy who caught on to the game so quickly that he began to use the multiplication die (at Level V) to compute his winnings. One day, his mother came to school to ask if I was teaching multiplication to the kindergarten children, as her son had startled them by frequently multiplying two numbers in his head.)
Determining a Child’s Math Concept Level: Unifix cubes helped determine each child’s concept level, with this simple test: The first time I tested a child, I began with 5 cubes (always of the same color). Holding out the five cubes, hooked together, I had the child count them out loud. Then I put them behind my back, broke some off and showed them to the child — keeping the rest behind my back. I then asked, “How many do I have behind my back? If they answered correctly, I put them back behind me, and brought out a different amount and asked again. If that, too was correct, I added on more cube, put them all together and had the child count aloud again, this time counting to 6. I kept that up until the child faltered — could not keep that number of cubes in their head , in order to give me a correct answer to how many I had behind my back. That number then became the concept they were to work on and what I wrote on the paper in their math bag for the Concentration Game.
Our Most Popular Group Activity: The Rhythm Band
We began every morning with 20 minutes or so of our rhythm band. We played along with several records, including Sousa marches, but the all-time favorite was the one with the Beatles playing”Penny Lane.” We met on the rug at the front of the room. The adjacent wall was lined with with 3 tiered, child-height shelving, beneath the main blackboard. Specific areas on that shelving were reserved for each type of instrument, and the children sat on the rug according to their instrument. So as they played, they were grouped together to make up sections similar to those in a band.
As the music played, I “conducted” the band by motioning in and out the various sections of the band. The children took this very seriously and watched for my signal for when they were to play. Our record and band playing each morning sounded out in the hall, so that eventually we had gifts of other instruments offered to us. One of particular value was an a professional-quality bongo drum. A boy just in from Mexico, who could not yet speak English, was particularly good at playing it, and I noticed he gained a respected place in the eyes of the children with his inspired playing, so it really helped him adjust to being in the country. The band became so popular for some children that they came into class early. They would select their instrument and sit down in the the proper place for that section on the rug — waiting for school to start. Then others came in when the bell rang, selected an instrument and sat in it’s designated place, creating a circle around me, with all of us sitting directly on the rug. We played for about 20 minutes each morning, and it was a great way to start the day!
Miscellaneous
Our classroom was divided into several areas, including the following:
A meeting place at the front of the room, near my desk, which was defined by a large area rug (which we all sat on directly – without chairs).
In the middle of the room, a large area for tables, one round one where I called children to me, another round we used for Bead Trading or other group activities, and several rectangular ones (with enough chairs for each child, but no assigned seating.).
Four interest areas, defined by adult-shoulder height dividers.
A library loft made by a parent.
In the back of the room: two easels, a sink, and 2 doors (one opening to the playground, another opposite, to the hall).
Two walls were lined with 3-tiered, child height shelving (also made by my husband), filled with equipment and materials for the children. We had small bins, one for each child, to store their personal belongings. (The local hospital donated small, patient wash bins for this, and we kept them on the bottom level of our shelving. ) We also had at least a dozen small rug samples (approximately 2.5′ x 1.5′) that I got from local carpet stores. These were essential, for as mentioned, children would place them on the large classroom rug, to define their work area — so others wouldn’t step on or stumble over the materials. I cut out smaller, felt mats for working with equipment on a table — again to define a child’s work area.
For more classroom ideas, click here for an article by Karen Lamb, the best teacher I ever had the pleasure of observing. She is also Teacher A, featured in my study of Outstanding Effective Classrooms. INSERT PDF OF KAREN’S ARTICLE and link to my study.
next —> a day in the life of an individualized language experience classroom