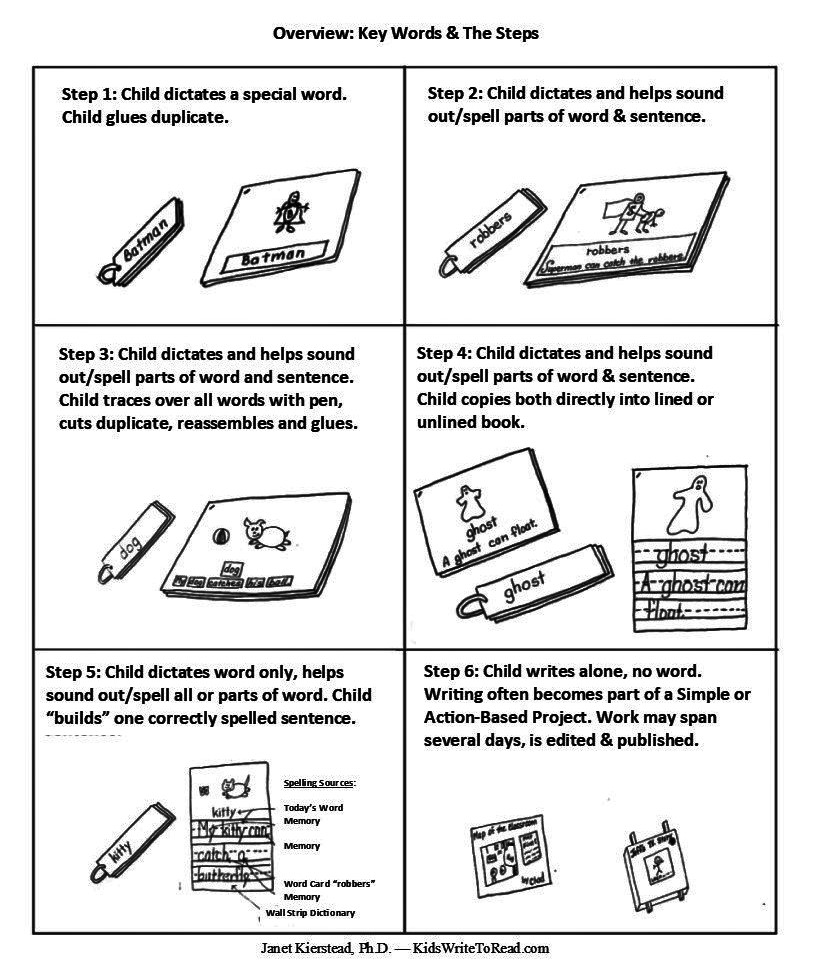
Following are excerpts from several pages in the broader website, KidsWriteToRead.com. I’ve pared them down here to give you the big picture and help you get started with Key Words and help a child move through The Steps — whether in the classroom or at home.
These two strategies — Key Words and The Steps — are at the heart of a child’s personalized reading/writing program. To augment this, it’s best to read to the child every day and to provide a rich variety of other activities: Singing, painting, talking, dancing, modeling, building, etc., and, of course, simple, unstructured play — alone and with others.
To begin, we look first at how to introduce Key Words so that you effectively establish the routines and procedures you want the child to follow as they work through The Steps.
Preparing to Introduce Key Words
 The first time doing this, you’ll need to plan ahead of time — and practice — how you’ll introduce Key Words. This includes deciding two things:
1). Where you want the materials to be kept — see GETTING STARTED, and
2) How you want the children to handle them. The Montessori practice of giving Silent Demonstrations is essential here. See INTRODUCING KEY WORDS — and especially practice giving Silent Demonstrations. The more carefully you introduce the activity, the more seriously the children will be about their work later. So time spent here pays big dividends in the future.
For the introduction, everyone who needs help with literacy skills starts on Step 1 — no matter how advanced they are. For this Step is just to learn the routine.
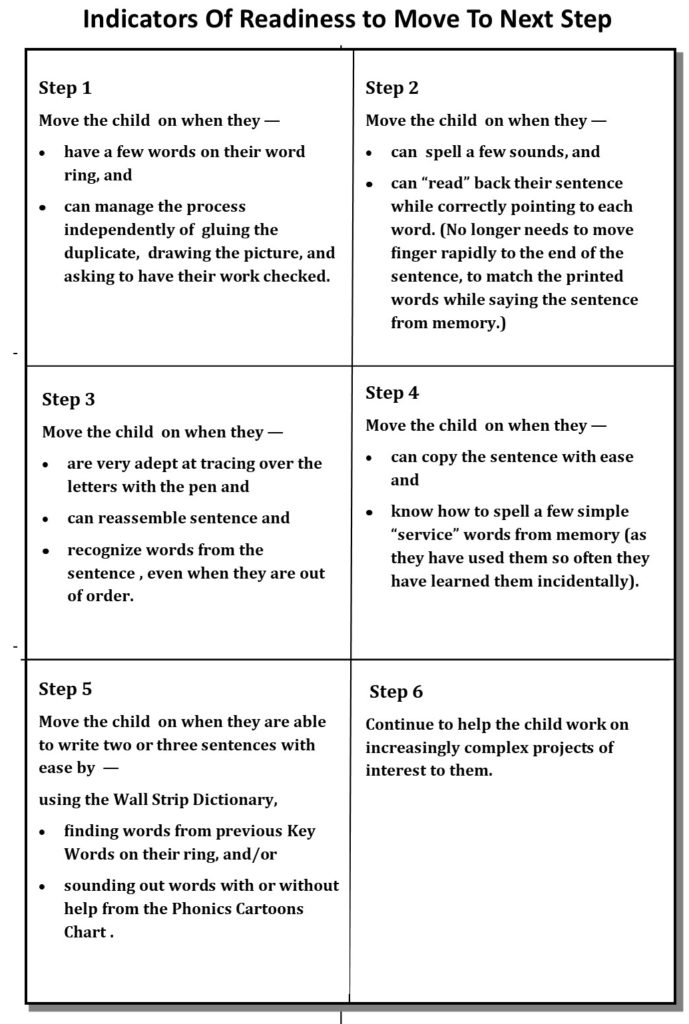
From there, you can advance each child quickly to their appropriate Step. The criteria at the bottom of this page will help you decide where they belong. Some will to Step 2, and those more advanced will skip to the later Steps. Some will take weeks, others months or even years to reach Step 6.*
The rest of this page tells you how to work with the child at each Step, but first — it’s critical that you keep a couple of things in mind. One is how essential it is that a child’s “word ring” has only words on it that the child immediately recognizes.The other is that you may want to modify some parts of the activities for preschoolers. So we’ll look first at those two aspects of this.
An essential practice: take words off the ring a child does not immediately recognize
Key Words connect the thoughts/pictures of the inner child to print. They are a powerful magnet that allows literacy skills to “stick.” And they give a child confidence with print.
It’s far better to have a small collection of powerful words, that give a child confidence, than a larger collection that cause a child to be uneasy about print.
So always take off any words a child doesn’t immediately recognize. Say something like, “That wasn’t a good word — let’s find a better one today. ” Never give hints or help them sound out a word.
Also, we don’t give a second Key Word on the same day. In the early stages, the child is not “reading” the word the next day — they are “remembering” the entire experience associated with the print they see. So we don’t give them two such vivid experiences in the same day, or they might mix them up.
If a child is forgetting words, take a little extra time. Talk long enough to settle on something they really care about, for which they have a strong feeling, a vivid “mind picture.”
Tips for working with preschoolers
The examples given here were developed for primary grades, K-3. But with some modifications, I have also very successfully used Key Words with children as young as 2 1/2 years old. So if you’re working with a younger child, see Key Words With Preschoolers for some ways to adapt for them the strategy described below.
The page for preschoolers also includes answers to some of the questions others might ask you about using Key Words with a younger child.
Introductory Session
Following is an example of how to introduce Key Words to a group. But you would follow virtually the same careful procedure with one child, alone.
1) Bring no more than four children at a time to your table. Have large writing books prepared with colored covers — with several copies of each color. (Recall the subheading, “Prepare Materials for Key Words,” is on the page, Getting Started.)
Invite each child to choose the color they want and write their name on the front of their book, as they watch. Also give each child a metal word ring and a word card with a hole already punched on the left end (as shown in the “Batman” image below).
Write each child’s name on their card and have them practice opening the ring, placing their name card on it, and closing it again. Have them place their book and word ring in front of them, fold their hands on top, and watch as you begin Key Words with the first child.
2) Begin your introduction to Key Words with the child you expect will respond most freely to your invitation to talk. Go through the procedure outlined for Step 1. (These are described below, under “DETAILED PROCEDURES…” on this page.)
3) Once the child has their word card and duplicate, get up from the table, taking all the children with you. Have the three children watching leave their books and rings behind. (You are about to demonstrate the entire follow-up procedure, and you will do this only one time, so be sure everyone is watching and has ample time to practice.)
4) Stop first where you have a paper punch tied with yarn or string someplace nearby. Explain that they will come here to punch a hole in their word card every day, and show them how to use the punch. Let each child practice on scrap, card stock paper. Then make a mark on the first child’s word card where the hole should be, and have that child make the hole.
5) Go on to where you have prepared a Gluing Station. Tell them you are going to show them how to glue, that you will not talk, and that they must be completely quiet, too, and watch carefully. Wait until everyone is quiet and watching. Then use a Silent Demonstration to show them how to apply glue to the duplicate of the word you have already given the first child. Show them where it will be placed the first page in that child’s writing book.
Focus especially on placing the duplicate upside down on a separate piece of paper provided for that purpose before applying glue. Then show how it will be placed it on the bottom of the page in the writing book, so it will appear under their picture. (But do not place it down onto the page.)
Then — speaking again now — while the others watch, let that child add more glue to their duplicate and place it on the page in their book. Have extra scraps of paper handy so all of the children can practice gluing and pretending to place it on the bottom of a page — without placing it down. (Pretending — just to save on paper.)
6) Walk everyone over to show them where they are to put their books after they have been checked. While there, explain to the first chil d, as the others listen, that they are to make a picture about their word and bring it to you when finished — to be “checked” and receive their pin* to signal they have finished their work.
(See more about checking work at the bottom of this page.* This topic is also discussed in Establishing Teacher and Student Work Cycles.)
7) Let the first child choose where they want to work and leave them there, reminding them to show you their drawing, once it’s finished. Return to your table with the other three.
8) Go through the procedure for Step 1 with the next child. Differences from here on will be twofold: The rest of the children will go alone to carry out the procedure they already all have practiced. And you will make a mark showing where the hole is to be punched on each child’s word card, before they leave your table. (They usually only need this the first time they do it.)
Once the children have watched another child get their word, you might want to invite them to start their drawing, rather than just sit and watch — if, that is, they already know what word they will be asking you to write for them.
So now, lets look in greater detail at exactly how to work with a child at each Step — first during the initial introduction — and thereafter.
Detailed procedures for each Step
Step 1:
1) The child “reads” all the words on their Word Ring. (Reminder: Never give hints., and take off words they don’t immediately recognize.)
2) Ask some questions until you strike a chord: What’s your best toy, special person? What’s something really scary? Do you have a pet — and if so, what’s it’s name, what does it like to do? Wait for something heart-felt to emerge.
3) Encourage them to describe what they’re thinking of in some detail: what’s happened, what it looks like, why it’s important, etc. The girl in this example has seen the book, Bedtime for Batman, and tells some of the story.
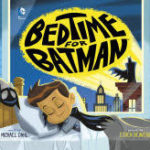 4) Ask, What word should I write? Here, she may have talked about both Batman and bedtime. It’s best not to ask, Do you want Batman or bedtime? That may cause the child to focus on both words equally, which might interfere with their thinking — confusing them when they think back on this session tomorrow to remember the word.
5) She has asked for Batman, so then say something like, “Now watch: I’m going to write Batman for you.” (Write on sturdy card stock, as shown below.)
6) Say the NAME of each letter as you write. (Most names include the sound, and many children already know the names from the Alphabet Song.) If the child’s eyes wander away, stop writing, and explain you can’t continue writing until they are watching.)
7) Have the child use the index finger of their writing hand to trace over the letters. If they go a different direction your letter formation program requires, stop them, demonstrate with your finger the direction they are to learn to go. Then them try it again. Do NOT try to guide their hand. (See charts for letter formation.)
8) Make a duplicate of the word on newsprint, for the child to glue into their book.
8) Remind the child that they are to bring their finished work back for you to see. (After they return and you check their work, send them off to find an activity from the the Supportive Environment you have established.)
9) Send the child off to the paper punch and Gluing Station — and later to make a picture about Batman.
Moving Through the Remaining Steps
Once the children are familiar with the routines, which usually takes 2 or 3 days — most are ready to go to Step 2, adding a sentence.
The teacher is always the one who decides when they are ready to move on and spends at least two days making sure they know what to do at their next Step. On the following days, they are assigned to an aide, parent or cross-age tutor. As time goes on, the teacher monitors their progress by calling them to the teacher’s table frequently.
Each step is just slightly more complex than the one before, and the teacher makes certain the child has mastered the requisite skills before moving them on. See indicators of readiness below before moving the child on to the next Step.
Step 2:
1) The child reads all the words on their ring, and take off any they don’t immediately recognize. (Do not give hints or help them “sound it out.”)
2) Talk. This child may have said, for example, I want “robbers” today, ’cause my dad showed me a special comic book he had when he was a little boy and it had robbers and Superman in it, and I really liked it. He’s really strong and so he can catch robbers. Then after that, we saw on the news about robbers, and my dad said there really are real robbers in the world…. In this example, the child has asked for robbers for their word (not Superman).
2) While writing the word robbers for the child, point out the spelling for ONLY ONE of the sounds needed. More than one sound a day can be confusing.
You can keep this very simple by emphasizing the name and/or the sound of the one letter needed. A child will absorb and retain a good foundation from that daily experience. Or you can use phonics cartoons, as described in Incorporating Phonics.)
If using phonics cartoons, follow this procedure:
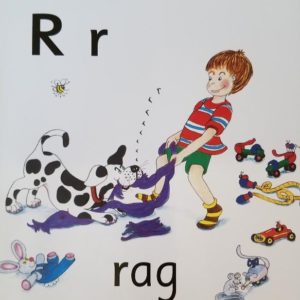 Remind the child of the cartoon or picture for rrrr in the phonics materials you’re using. In this example, a dog is growling “rrrr” as it pulls at the rug. The cartoon shows the common spelling for that sound coming out of of the dog’s mouth.
 - “Before you send them to look for the letter that’s on the cartoon, tell them that when they return they will need to be able to show you the letter they find by making it with their finger on the table. Have the child make the rrrr sound again before they leave you to find what letter is on the cartoon.
- When the child returns, have them form the letter on the table, with index finger of their writing hand.
- If they have forgotten it while walking back, don’t tell them — send them to look again. (Having to keep the sound and letter in mind, while going back and forth — then also having to trace it on the table — they usually remember it from then on.)
- Once they have correctly formed the letter on the table, write it for them on their word card.
3) The child traces, with their finger, over all the letters in the word.
4) Help the child trim down what they’ve said, to make one sentence easy enough to remember and”read” back. This might be, Superman can catch the robbers.
The child watches as you write, and the two of you read the sentence aloud a couple of times. Touch each word as you both read. The child need only remember the word on the Word Ring, to keep it. They are not expected to accurately remember the sentence.
5) You make a duplicate, the child leaves you, glues it in, makes a picture, and shows it to you when finished.
Then to check for readiness to move to the next Step: After a child has been at Step 2 for awhile, try asking them to point to each of the words as you both read the sentence. Once they are able to do that accurately, try asking them to point to the correct word — as you ask for it out of order. (See Indicators of Readiness To Move To Next Step, at the bottom of this page.)
Step 3:
 Same procedure as in Step 2, but this time while the adult/tutor writes, the child helps supply the letters they know and refers to the phonics materials you’re using to discover and trace on the table the letter of just the ONE more new sound you’re emphasizing that day.
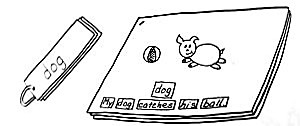 This time the duplicate is written by the adult/tutor on a narrow strip of paper and the child cuts it up. Each word falls on the table, the child scrambles them up and reassembles them. The adult/tutor helps the child “read” the sentence aloud, perhaps scrambles it again and has the child reassemble it. Each time they read/say the sentence again together.
The child leaves the table, glues the words to recreate the sentence and completes their work, as before. It’s best to keep the child at this Step perhaps a little longer than necessary, as long as they are not bored with it or impatient to move on.
For Step 3 is perhaps the most valuable Step. For here, we are helping the child develop two types of skills — pre-reading and motor skills —
Pre-reading Skills: By having the child cut up and reassemble, we’re prompting them to notice the beginning and ending letters of a word — and notice the length and shape of the word.
And this brings me to point out something important. No one knows exactly what a person does as they read, and anyone claiming to know this for certain, only really knows what they think they have figured out so far. So rather than arguing for one type of instruction, I argue for doing what works — and not trying to explain exactly why or how it works.
For instance, some people claim that only phonics-first works, that it’s based on science and how the brain is wired. I have no interest in arguing with them about this — only to say that I have seen children turn the duplicate of their sentence over to show only the blank side of the words that have been cut from the sentence. And then I have watched as they reassembled the sentence correctly — just by judging from the length and shape of the words. (They have been able to see the shape, because some children cut around the letters in the word — so this shows where the “t’s” and “h’s” are.)
I take seeing a child do this as evidence that more than phonics is involved — although phonics is obviously important. So what I do know for certain is that a child can begin to identify words at this stage by using a combination of phonics, word recognition, shape and size of the words.
Motor Skills: While first moving the child to Step 3, we write the duplicate in pen, as before. But as we see their motor skills advancing, we make make the duplicate with pencil and have them trace over it, with pen (or vice versa). It’s important that they can do this with ease before moring on, for the rest of the steps depend on their ability to form the letters independently.
So ample time should be allowed for Step 3. Reassembling the sentence a few times each day not only helps them develop the skills that go into reading, but it also expands their base of sight words they can recognize and begin to spell from memory. Also, a preschooler who still needs to learn to use a pencil (and may need help with scissors), also benefits from extra time at this step.
Step 4:
Same procedure as before, except that the child begins to copy the duplicate: At the Beginning Step 4, the child traces over with a pen what the adult has written with a pencil (or vice versa). At Advanced Step 4, the child copies the word and sentence directly into their writing book — either on lined or unlined paper, depending on their motor skills. 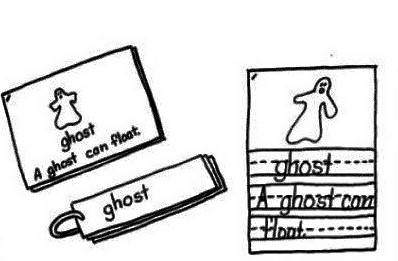
Step 5:
Same procedure as before, except that the adult writes only the word and shows the child how to “build” a sentence from the supporting materials on the 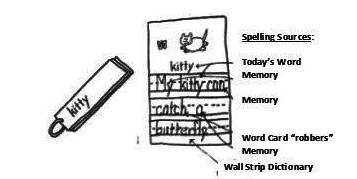 classroom walls: charts of any songs or poems the class has learned; a chart of high frequency words, and a class “Wall Strip Dictionary,”which is within easy reach and used for recording words needed. More about the “living” Wall Strip Dictionaries is in Phonics With Key Words.
Step 6:
The child no longer gets a word. Instead they write long, complex stories and carry out projects related to math, science, or social studies. Children engage in two types of projects:
Simple Project: This is basically a report of something the child has learned through reading, conducting  interviews and/or surveys.
One example is making a map of the classroom to scale, writing about what they did and how they did it, and then putting both on display. They use large, colored construction for a backing when displaying work, as shown here.

Another way of publishing a report — or just telling a story — is making a TV show or documentary. Here you see the child has had someone cut a square hole in the front of a box. This can be a fairly large box, or a very small box that had contained matches. Then on a long strip of paper, the child marks off sections the same size as the hole in the box. The paper is secured to two pieces of wood, so the child can twist the story to display the sections in sequence.
Action-Based Project: This kind of project has a greater purpose in mind — to make a positive change, either doing it themselves or by influencing an authentic audience (i.e., someone or a group in a position to make the change). One example of this is extending the example above, where the child drew a map of the classroom. By redrawing the map of the classroom, the child would show how to make space for a new interest area — then present it to the teacher and the entire class to try to convince them to make the change.
I developed the idea of Action-Based Projects in my work with older students for the California Dept. of Education, but these projects can also be simplified for younger children. For more ideas, see Projects — For All Ages and pages 31 – 32 in my article, Yes, A Balanced Approach, But Let’s Get It Right!
overview of the 6 steps
Moving the child forward
With The Steps, a child is always operating at a level that’s relatively easy for them. You need to strike a happy medium: move them on when what they’re doing seems too easy, but you never move them on if it’s going to be a struggle. Here are the guidelines I used for deciding when to move a child forward:
* Whether at home with a small group — or with an entire classroom — as children move through The Steps, you may need help keeping tract of exactly what to do with each child. You’ll find directions for each Step — in PDF files to print on card stock and attach on each child’s Word Ring.

